The factory shocks
and mounts had not worked for quite a while. I had stuck
with the factory shocks and the Rockstomper U-Bolt flip for a while,
but now with the new 5 inch lift I had to do something completely new.
I had used Rancho
RS9000's on the past on another vehicle and was very happy with them.
I decided to make a new rear shock mount setup and use the
newer version of the RS9000, the RS9000X.
I purchased them from Central
4 Wheel Drive in Sacramento. As it turns out, I was
told that they come with a lifetime warranty also!
|
|
|
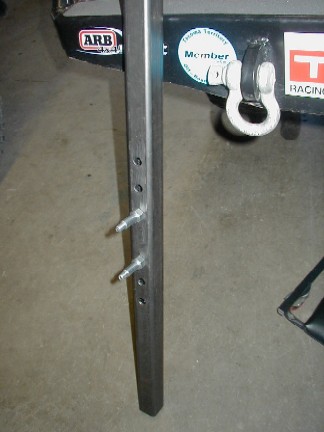
Since
we were making a completely new setup, we started with a new top shock
crossmember. I used a 3/16th wall 2X2 square tube. I
wanted to have some adjustablilty so we decided to have multiple top mounts,
changing the angle and therefore the effectiveness of the shocks. We
started in the center then marked out three top positions for the shock
mounts.
|
|
|
The
holes for the shock mounts were then drilled.
|
|
|
A
larger hole was drilled on the back side so you can get a socket on the
shock stud.
|
|
|
Here
is what it looks like at this point.
|
|
|
And
the back with the larger holes.
|
|
|
We then put the
top crossmember in the truck and then used the forklift to flex the
rear suspension.
Knowing where we
were going to mount the lower mounts on the axle, we could not figure
out the minimum and maximum lenghts. Knowing this, we could
order shocks!
|
|
|
The minimum length
we got was 20inches, the maximum was 29inches.
This meant that
the Rancho 99012 would work for us perfectly, as it has a minumum length
of 19.375inches and a maximum length of 32.250 inches.
|
|
|
The rear BPV (Brake
Proportioning Valve) was going to be in the way, plus the adjusting
bolt was slightly bent so I figured it was time to just chop it out
all together.
I found a small
piece of sleeve and drilled a hole through it.
|
|
|
I
then bent a piece of flat stock and cut a small piece of box to the same
width. I drilled a hole through it (all the way through) as
seen here.
|
|
|
I
welded the box onto the flat stock.
|
|
|
The
next step was to cut the arm that used to go down to the axle. It
is made from spring steel and is not easy to cut!
|
|
|
Once
it was cut, you can see how it all goes together. The piece
of thread stock was welded into the small sleeve, then the arm goes throught
the hole drilled earlier. This setup allows you to adjust
the valve for proper front to rear balance with the two nuts above and
below the box.
|
|
|
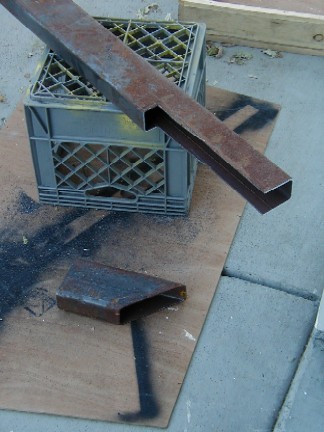
The
next step was to make the rear lower shock mounts. I used
some scrap metal I had laying around and cut some U shaped pieces.
|
|
|
Here they are. All
that remains is to drill holes for the shock mount studs.
There are two sets
here, as we were setting up two trucks.
|
|
|
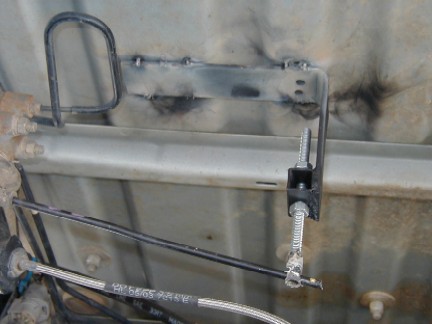
On
the rear axle on the passenger side, there was a small mounting bracket
that the brake line and the ABS sensor line mount to. This
was in the way, so it had to be moved. Remove the two bolts
(12mm) that hold the ABS line and brake line to the bracket. I
unplugged the ABS wires from the backs of both wheels at this point to
get them out of the way.
|
|
|
I
then used the sawzall to cut the bracket off the lower mount.
|
|
|
Once it was cut,
I just bent it out of the way for now.
The brake line was
slightly adjusted and the upper and lower shock mounts were welded into
place.
|
|
|
After
they were welded, I tacked the end of the factory bracket that we cut
earlier back onto the top of the lower shock mount. Everything
was then cleaned and primed.
|
|
|
The
upper shock crossmember is attached inside the frame rails. It
was an extremely tight fit, but it made it!
|
|
|
The
shocks were mounted and off we went for a test drive. I put
the shocks on the second setting, fairly soft and it rides great. I
will have to play with the different settings in the future.
|
|
|
|
|
|
|
|
5-1-2004
|
|

|